This simple tutorial will guide you in the creation of a Ribbon Stretchy Spine. Nowadays it's not as commonly used as the IK Spine Rig but it fits well in a cartoon rig. It will be fully stretchy and will have twist from the three controls we are going to create.

First of all we have to create a NURBS plane. The spine will have 5 joints so the NURBS plane needs 5 V patches and must have a Cubic Surface degree.
This will create a NURBS plane along the Y axis with 5 V patches and 1 U patches and three degrees in both U and V. But we'll have to rebuild the curve so it only has 1 degree in U because we only need three degrees in V.

To do that we select the NURBS plane and click (in the Surfaces module) on Edit NURBS>Rebuild Surfaces. In the option window we select the U direction, set the U spans to 1 and the U degree to 1. The V values will be ignored.

Now the NURBS plane should look like this:

In the next step we have to attach a Hair System to the NURBS plane to use it as the drivers for the joints that will be skinned to the model.
We have to select the NURBS plane and click (in the Dynamics module) on Hair>Create Hair. The U count must be set to 1 and the V count must be set to 5.

This will create a full Hair System but we only need the follicles so we have to delete the output curves and the hairSystem node.


Now we have to create the joints. Place then individually at the same position as the follicles and then parent them under each follicle.

Now if we move any Control Vertex of the NURBS plane the joints will follow the plane perfectly.

The next step is to create the driver system for the spine rig.
First of all create a joint structure for the top, middle and bottom parts of the NURBS plane and place them as the image below.

Now create the controls that will drive the joints and locators that will be used to Aim Constraint from top to bottom and vice versa, and also locators that will be used as the Up Object for those Aim Constraints.
The scene and Hypergraph should look as the image below.

Now we place the joints under each Aim locator.

The next step is to Aim Constraint the locators.
First, select the topCtl object, then shift-select the btmAim locator and click (in the Animation module) on Constraint>Aim Constraint.
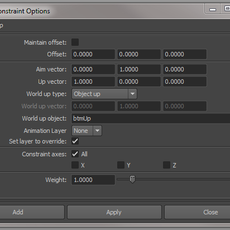
Set the Aim Vector to Y, the Up Vector to X and the World Up Type to Object and type btmUp.

Next, select the btmCtl object, then shift-select the topAim locator and click (in the Animation module) on Constraint>Aim Constraint.
Set the Aim Vector to -Y, the Up Vector to X and the World Up Type to Object and type topUp.

Now select both topCtl and btmCtl and then shift-select midCtlGrp and create a Point Constraint.
After that we have to aim the middle control to the top control, so select the topCtl and then shift-select the midAim locator and create an Aim Constraint. Set the Aim Vector to Y, the Up Vector to X and the World Up Type to Object and type midUp.

The system should now look like this when you move it around.

Now we have to bind the driver joints to the NURBS plane so the system we created can drive the joints that will be smooth binded to the geometry.
Select the topDriver00, midDriver00 and bottomDriver00 joints and then shift-select the NURBS plane. Then click (in the Animation module) on Skin>Smooth Bind with these options.

Now, when you move, for instance, the center control, the NURBS plane will deform, moving in the process the joints placed in the NURBS plane. We will have to change the weighting on the Control Vertex so we can draw a perfect arc when we move the middle control.
Select the Control Vertex and click Window>General Editors>ComponentEditor. Go to the Smooth Skins tab and change the weight values until it look like this or until you have the deformation you're looking for.

Finally the Ribbon Stretchy Spine is finished. You may like it or not, but it's just another way to rig an stretchy spine, a long neck or to rig anything you may find this system suitable for.

You can also read this tutorial here: https://joseantoniomartinmartin.com/2010/06/20/tutorial-ribbon-stretchy-spine-rig/
Author: Jose Antonio Martin Martin
Submitted: 2010-06-20 11:11:53 UTC
Tags: maya, Rig, spine, and ribbon
Software: Maya
Views: 57,068
Related Items
-
Fire Ant Maya Rig 0.0.1 for Maya
$100.00 (USD) -
Nick-Maya Rig With Advance Facial Setup for Maya 0.1.0
$20.00 (USD) -
Meerkat Maya Rig 0.0.1 for Maya
$75.00 (USD) -
3D Sphynx Cat Maya Rig 0.0.1 for Maya
$250.00 (USD) -
3D Silver Cyborg Maya Rig 0.0.1 for Maya
$200.00 (USD) -
A Chipmunk or Squirrel Maya Rig and Model 3D Model
$340.00 (USD) -
Tanner Saurus Rex - 3D Maya rig 3D Model
$7.00 (USD) -
Crab Rig for Maya 1.0.0
$50.00 (USD) -
Fairy Rig for Maya 1.0.0
$50.00 (USD)


